
This is the third and final part of the series on bringing your electronics or software idea to life, and covers what to prepare for the designers and engineers that will bring it to life as well as what to expect from the development process.
Once you’ve refined the concept for your project and determined your target audience and the function (step 1) of the system, and you’ve decided if your aim is for this leg of the project is simply a proof of concept, a working prototype or a production ready system (step 2), you’re ready to sort your priorities, specify the constraints and finally talk with a consultant about making it a reality.
Sorting Priorities

The universe is all about trade-offs and, in the simplest terms, can be stated as the classic “fast, good, cheap: choose any two”.
Much of an engineers job is working to strike the right balance between various trade-offs. These decisions are made according to your priorities.
For example, if high performance is an important priority, an electronic device can be designed to achieve this aim in different ways. We could:
- choose high performance components, though this might impact the final cost per unit device;
- run a processor at a higher speed (clock frequency), though this could require more energy and reduce battery lifetime and/or increase EM noise emissions;
- use operations that are more memory intensive, leading to higher part count, different choices in terms of parts, increase in PCB size and/or leave less memory for other functions.
Even knowing that processing speed is the first priority, which path to choose will depend on secondary objectives.
Though some of these are implicitly covered by the previous steps of your plan’s elaboration, it is worth ordering the following goals in terms of priority:
- high processing performance/speed;
- reduced device size (PCB footprint);
- low power consumption/long battery life;
- exclusive ownership of intellectual property;
- device reliability/robustness;
- high precision (of measurements, calculations, as applicable);
- low development costs;
- low cost per unit, in production; and
- speed of development/quick turnaround;
Though all of these are desirable, which are most important in your application and which might be sacrificed to attain our primary goals?
Specific Constraints
In addition to the prioritized list of objectives, any specific constraints should be detailed. 
This includes any hard limits, such as specific deadlines, a fixed ceiling on unit cost, a minimum capacity for fabrication (X units/month), maximal dimensions, etc. Basically anything that the consultants should know before starting on a project.
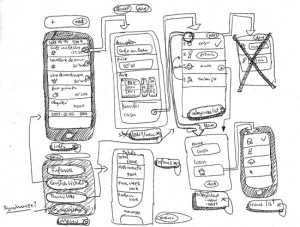
Wireframes
If your project involves a graphical user interface (GUI), be it a mobile application, a web service or a desktop program, preparing a set of wireframes can be a great way to communicate your expectations and it makes preparing a fixed quote much easier.
Wireframes don’t have to be pretty, and can even be hand drawn outlines. The important thing is that they group related items together and give an idea of how everything will be organized and present the way end users will interact with the system.
Technological Selections
You may have some specific technology in mind while planning your project. Clients often come to us with requests for projects using specific components or platforms, such as Arduino, a specific Bluetooth low energy device like the BLE Nano or Bluegiga BLE112, a ZigBee module, etc.
We’re happy to accommodate and it’s always a pleasure to use a chip that hasn’t been included in one of our previous creations, as getting acquainted with new tech is lots of fun. However, the important question in this case is not so much which tech you want to use but exactly why you’re looking at a specific piece of tech.
If some component is of interest, let your consultant know but be sure to include the reasons why you feel it is the right choice for your project. It may be that there are other options that meet all your objectives while having additional advantages.
For example, Arduinos have many advantages, the most important of which are ease of use and a large community of developers that are very familiar with the system. Sometimes an Arduino Uno is the perfect fit for a project (especially a quick proof of principle) but it’s important to realize that there are three things people refer to as “Arduino”:
- the Arduino boards, i.e. the hardware like the Arduino Uno, Due and Yun products;
- the Arduino IDE, the development environment used by many to program Arduino devices; and
- the Arduino SDK, the list of functions created to make the underlying hardware easy to use (e.g. the pinMode() and digitalRead() functions).
and some are better suited to specific applications than the others.
The Arduino products are a good fit for proof of concept projects, but are usually a bit bulky and expensive for anything more serious.
The Arduino IDE can be useful if you want to work with the firmware code yourself, but isn’t much use to professionals. Be sure to specify if you want to be able to make modifications to the source code using the Arduino IDE as this can impact how the source code is organized and written.
The Arduino SDK gives you ease of use, access to a large developer community and lots of open source libraries, but the really great thing is that it can be used on a huge array of different hardware (we’ve used it on official Arduino boards, custom PCBs with AVR chips, XMEGA chips, the BLE Nano, the ESP8266 Wifi modules, and more) so you get the advantages of the SDK and the flexibility of choosing from lots of different hardware.
The point here is: tell your consulting team why you’re interested in specific tech and it may be the perfect choice, or you may be surprised by the other options that are available and how they can help you meet and exceed your project goals. To know the types of tech we recommend and use, there’s also a whole HOWTO on selecting specific tech for your needs.
Planning Ahead
The final set of elements to prepare are those things that you’re not yet ready to implement yet but that may be of interest in the future. Eventual expansions, enhanced functionality, new types of users and use cases… it’s a good idea to describe anything you think may be interesting to explore in the future.
There are two main reasons to do this:
- some features may be a simple matter to include immediately, and it may be worth doing so; and
- it’s much easier to divert an asteroid when it’s still far away.
By that second point, I mean that preparing the terrain for some future additions while in the initial design stages can be the difference between having a minor project add-on down the line versus needing to redesign a PCB from scratch to accommodate new hardware or capabilities.
As an example, lets say you want a simple bluetooth beacon that reports it’s GPS position to mobile apps. This could be designed using, say, a BLE Nano and some GPS module.
But if you know that, down the line, you’ll want to control a bunch of motors through the app, or that you’d like to be able to send SMS messages from any location to the device… this might involve starting over because the Nano doesn’t have enough output pins or because there’s simply no functionality for cellular access in the system. Knowing this from the start, we’d instead choose another bluetooth solution, or use the GPS functions of a GSM chip rather than focusing on a pure GPS solution. This would make the future changes a simple matter of updating the software, and all the work of designing the circuit and laying out the PCB could be re-used in version 2 without any modifications.
What to Expect
Once you have assembled all the elements described in this series, you’ll have the following items:
- A clear description of your concept, users and function;
- A specific goal for the project: proof of concept, prototype or production-ready material;
- An ordered list of priorities, a set of hard constraints and a description of the UI; and
- Details concerning future developments.
which is sufficient to develop, along with your consultants
- a detailed list of requirements;
- a specific set of deliverables; and
- a precise development path.
With these, we can provide a fixed flat fee quote and you’ll know exactly what you’ll get, how much it will cost and how long it will take. When you get to this point, all the hard work on your end is done, and your only responsibility is to be available to answer questions and carefully review progress.
We like to split the implementation steps such that there are milestones along the way–specific markers of progress–with the final cost being split evenly along with delivery of all the elements related to each milestone. The number of milestones and payment slices will depend on the scope and duration of the project, but is usually around 4 to 8.
A report is prepared at each milestone, as well as at each important step along development (or weekly for longer lived procedures).
Once a fixed set of deliverable and final price has been established and agreed to, the project begins on reception of the initial deposit and proceeds according to the path described in the quote document.
Quote, reports and other documentation is provided as PDF files, web application demonstrations are provided through the web, where applicable, and video or live presentations are made for hardware functionality demos. Hardware projects usually include 1-3 assembled and tested prototypes, which are physically delivered prior to the final payment. All developed resources (source code, circuit design, PCB layout, documentation, etc) and ownership thereof are transferred within two business days of reception of final payment.
Ready To Go?
Hopefully this series on going from idea to marketable product has been useful to you in preparing to move from vision to reality. If you’re ready to get started, or have any questions or comments about this HOWTO or your own project, please don’t hesitate to get the conversations started.
Good luck with your project!